

When your computer’s disk usage reaches 100%, you’ll notice an annoying operating system freeze. Unfortunately, most HDDs and some SSDs suffer from 100% full usage issues with Windows 10.
Of course, there are many solutions to this problem. But, first, let’s explain what this percentage means and how to know if your computer is suffering from it when it freezes.
Read also:
- Increase the RAM of your phone via the internal or external memory card MicroSD
-
SSD Solid State Drives, Which is Better, PCIe or SATA? and What is the difference between them ?
-
Types of Intel 10th Generation processors, and how to choose the best ones!
-
Ryzen 3000, A Complete Guide to AMD Ryzen Processors, How to Choose the Best?
-
Review of the Asus ROG Phone 5, the awaited gaming phone with 18 GB RAM!
What does disk usage mean?
Each HDD or SSD has a specific write speed and read speed. When you buy a new storage unit for your computer, you can read its speed in its specifications table. For example, the latest BarraCuda disk – with a capacity of 1TB, a size of 3.5 inches and a spinning speed of 7,200 rpm – comes from the famous company Seagate, with a transfer speed of up to 210 MB/s.
100% disk usage means that your disk has reached its maximum capacity, i.e. it is fully occupied with performing tasks. In our previous example, if the tasks you are running on your computer use the entire disk capacity of 210 MB/s this means that the current disk is using 100% of its transfer capacity.
How do you monitor disk usage?
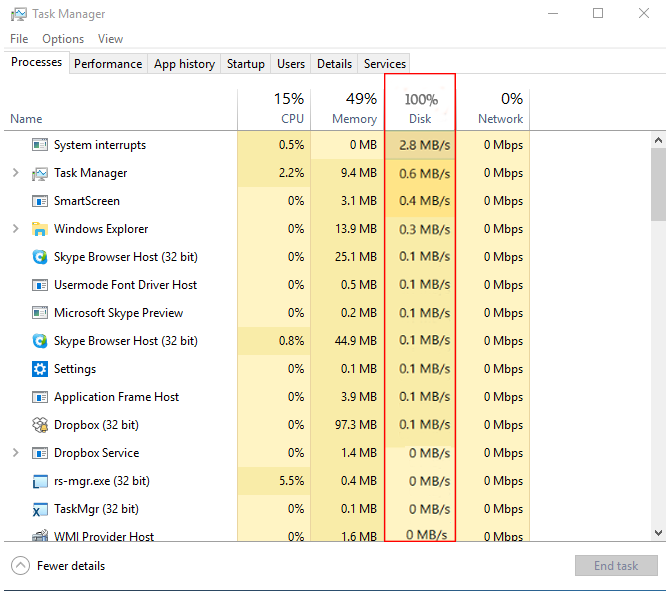
You can monitor your disk usage from the task manager. You can open the task manager by right-clicking on the start bar and selecting Task Manager.
The third column shows the percentage of tasks that use your hard disk. As you can see in the picture below. The tasks use 100% of the disk’s capabilities.
If your kid’s disk usage reaches 100%, you will notice freezing in your computer’s operating system and annoying lags in applications.
100% disk usage problem solved
First solution: Check for hard disk errors
Wouldn’t it be great if all hard disk errors could be fixed in just a few clicks? This is exactly what Microsoft’s built-in CHKDSK tool does for Windows. CHKDSK can detect hard disk errors as well as file problems.
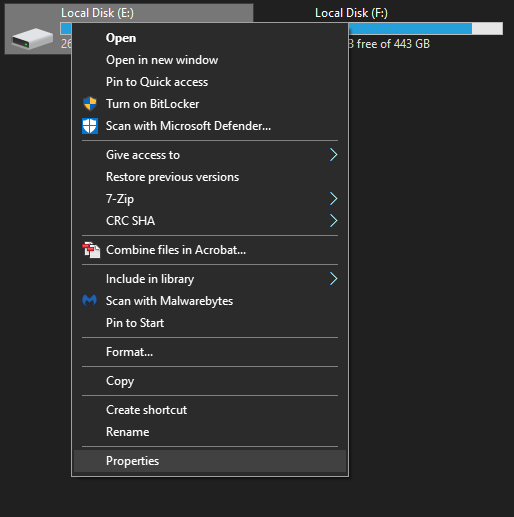
To run CHKDSK, open This PC. Right-click on the disk you want to check for errors and go to “Properties”.
After that, in the Tools tab, you will find the first tool titled Error checking, click on the Check button.

Second solution: Disable SuperFetch
SuperFetch is a technology that first appeared with windows vista. This technology makes sure that the data used is fetched from the fast RAM rather than the hard drive. This speeds up the loading time of the application you are using. SuperFetch technology can cause 100% disk usage especially in Windows 8 and 10. So it is best to disable it.
To do this, open a CMD command prompt and type the following command:
net.exe stop superfetch
Third solution: Check for viruses and remove them
Have you tried all the solutions above and still 100% disk usage? Another possibility is viruses. The virus may be running in the background and consuming your disk. So detect and remove viruses with the help of an antivirus installed in your system or with the antivirus built into Windows 10 (Windows Security).
Fourth solution: Disable Windows search to lighten drive load
Windows Search aims to make searching for files on your computer a lot faster, but the problem is that it increases the load on the system drive. You can completely disable Windows search to fix the problem.
To do this, just open the Start menu, type Services, and then click on its icon.

In the Services window, go to the Standard tab and find Windows Search and double-click on it.

The Windows Search Settings window will appear. From the drop-down menu, click on Disabled, then OK. This will prevent Windows Search from running in the background after restarting your computer.

Fifth tip: Defragment your hard drive
Once you have completed the above procedures, you can improve the performance by running the Defragment Tool in Windows.
To understand the meaning of defragmentation, you must first understand the mechanism of storing files on the hard disk. In fact, the data blocks of a single file are not always stored in one place on the hard disk, but rather are stored in different places on the spinning disks of the hard disk. If your files are fragmented, the data blocks will be split into locations far from each other on the spinning disks. Therefore, it takes longer for the drive to read this file. Drive defragmentation places the blocks of data for each sequential file in sequential order, so that the drive cursor does not move around the entire drive to read a single file.
Note: Defragmentation should only be done when the hash rate reaches more than 10%.
To start defragmentation, open This PC. Right-click on the disk you want to check for errors and go to “Properties”.

After that, in the Tools tab, you will find the second tool titled Optimize And Defragment Drive, click on the Optimize button.

Check the percentage of fragmented files in the results. If it appears that you need to defragment the drive, click Optimize.
Tip 5: Check out the malfunctioning apps and services
Some services or applications running in the background can overload the hard disk. Open the Task Manager in Windows. Click on the Disk menu.
The tasks will be arranged in descending order from most to least use of hard disk resources. You may notice that the OneDrive backup service, for example, is using a lot of device resources. In this case, try to schedule the backup process to take place at a time when you are not using the computer. Also, the Windows Update service can cause a large disk load. In the same way, you can schedule a Windows update when the device is not being used or turned off.
It has been observed that some applications such as Skype or Steam or update services for some such as Adobe Updater use hard disk resources a lot. Try to prevent it from running in the background, for example.

Finally: check the condition and specifications of your hard drive
You can use the above solutions to try to lighten the load on your steel-cut. But if the problem continues to appear, your hard disk capabilities may be weak.
Your drive may be out of date; It may have a manufacturer defect, or the transmission cables may need to be replaced. If you own an HDD, it will definitely be worth the extra money to upgrade to an SSD. We always recommend using modern SSD disks as they have a high data transfer speed. At least buy a small SSD upgrade unit to install the computer system on and leave the HDD for storage.
Try these fixes the next time your Windows PC slows down. Be sure to review your Windows disk usage periodically to identify performance issues that need an immediate solution.